How to Use VLOOKUP in Google Sheets
If you work with a large dataset in Google Sheets and need to find and bring together specific information quickly, the Google Sheets VLOOKUP function is the number one solution.
Let’s say you have a list of products and their prices in one table and a separate table with customer orders. You can also use VLOOKUP to match these tables, save time manually cross-referencing, and ensure accurate pricing in your records.

With a few tricks, you will confidently handle data and won’t make mistakes in your formulas. In this article, we’ll walk you through these tips and tricks so that you can start using this function without any challenges.
What is VLOOKUP in Google Sheets?
VLOOKUP in Google Sheets is a function that helps you find and retrieve information from a table. It's similar to a search function for your spreadsheet. You give it a value to look for, tell it where to search, and then it retrieves the corresponding data. It's convenient if you need to quickly get specific data without manually scanning through a large dataset.
🎥 Looking for a more visual explanation? Watch our detailed video on using VLOOKUP in Google Sheets. This video complements the article and provides step-by-step guidance to enhance your understanding.
Syntax for VLOOKUP Function in Google Sheets
This is the standard VLOOKUP formula:
=VLOOKUP(search_key, range, index, [is_sorted])
- search_key: The search value you’re looking for, like a name or a number. Ensure the search value is correctly formatted to avoid errors like #N/A.
- range: Where you’re searching, usually the columns with your data.
- index: The index column with the information you need, like prices or names.
- is_sorted: This part is optional. If you put FALSE, it looks for an exact match (which is often a good idea). If you don’t put anything, it assumes you want an approximate match.
Example of VLOOKUP in Google Sheets
We will be using an employee dataset to demonstrate the VLOOKUP formula in Google Sheets.
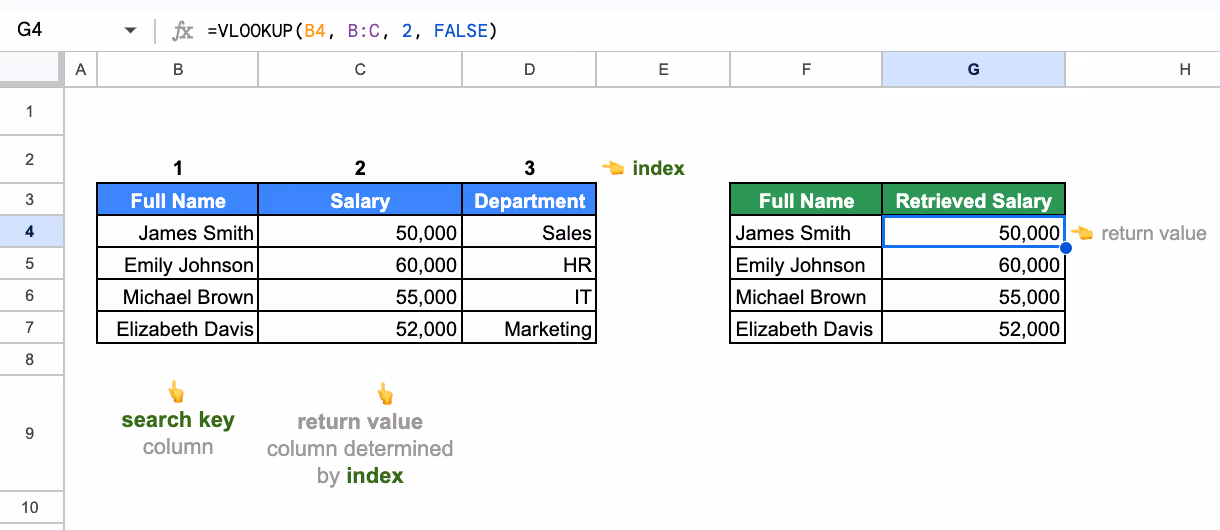
Suppose you have a “Full Name”, “Department” and “Salary” dataset, and you want to fetch the salary of an employee by their name in a separate table.
You can use the following formula:
=VLOOKUP(B3, B:C, 2, FALSE)

Here:
- B3: Refers to the cell containing the employee’s full name, for example, “James Smith.”
- B:C: Specifies the data range where the lookup occurs. Column B contains the names, and column C contains the corresponding salaries.
- 2: Indicates that the salary value is in the second column of the range.
- FALSE: Ensures that VLOOKUP looks for an exact match.
This formula retrieves the salary of the employee listed in C2 and displays it in the corresponding cell in the “Salary” column of the new table.

The Benefits of Using VLOOKUP in Google Sheets
Using the VLOOKUP function in Google Sheets has several advantages that help handle data. Let's look at 5 of them:
- Find data easier: VLOOKUP works like a built-in search tool, letting you instantly locate specific values in large datasets without scrolling or filtering manually.
- Puts everything together: It allows you to pull related data from different tables or even across multiple sheets, as long as the lookup values align in the same row, making it easier to consolidate scattered information.
- Less mistakes, more accuracy: By using formulas instead of manual inputs, VLOOKUP helps eliminate copy-paste errors. Setting the match type to FALSE ensures only exact matches are returned, boosting data reliability.
- Conditional lookups for smarter results: VLOOKUP isn’t limited to basic lookups, you can combine it with functions like IF or use multiple criteria. This allows you to return different results based on specific conditions
- Keeps data in check: VLOOKUP can validate user entries against predefined lists or reference tables, helping prevent incorrect or inconsistent data from being entered.
- Decide faster: With all the relevant details automatically pulled into one place, VLOOKUP supports quicker analysis and more confident decision-making, especially when dealing with time-sensitive data.
Practical Examples of the VLOOKUP Function in Google Sheets
Now that you have a better grasp of the function, let's see some common examples of using VLOOKUP. Here are various ways you can apply VLOOKUP formulas in Google Sheets.
VLOOKUP Partial Match using Wildcards in Google Sheets
VLOOKUP can be used to find values based on partial matches, making it a powerful tool for scenarios where you don’t have the complete search key. By combining the lookup value with a wildcard (*), you can locate entries that start with specific characters or contain a particular string.
This flexibility is ideal for dynamic lookups. However, VLOOKUP only returns the first matching result by default. When there are multiple matched search keys, ensure these keys are assigned unique values to facilitate proper searching and avoid unexpected behaviors.
Suppose you have a list of full names and email addresses in a dataset, and you want to find an email address based on the first few characters of a name.
You can use this formula:
=VLOOKUP(F2&"*", B3:C10, 2, FALSE)

Here:
- F2: Contains the prefix of the name you’re searching for (e.g., “eli” for “Elizabeth Davis”).
- &”*”: Combines the lookup value in F3 with a wildcard (*) to create a “begins with” match.
- B3:C10: Specifies the range containing the “Full Name” and “Email” columns.
- 2: Indicates that the email address is in the 2nd column of the range.
- FALSE: Ensures an exact match for the prefix.
If F3 contains “eli”, the formula will return: elizabeth.davis@example.com
Using this method, you can dynamically search for email addresses without knowing the full name. It’s handy for large datasets where only partial information is available.
VLOOKUP Exact Match in Google Sheets
VLOOKUP with an exact match searches for a specified value in the first column of a range and returns a corresponding value from another column. Using the exact match ensures that only precise matches are retrieved, making it ideal for accurate data lookups.
Suppose you have a dataset with employee names, emails, and their respective departments. You want to find an employee's department based on their email address. Here’s how to do it using VLOOKUP with an exact match.
You can use this formula:
=VLOOKUP(G2, B3:D10, 3, FALSE)

Here:
- G2: The cell containing the email address you want to search for (e.g., "sarah.lee@example.com").
- B3:D10: The range that includes the "Email-Ids" (column B), "Names" (column C), and "Department" (column D).
- 3: The column index for "Department," which is the third column in the range B3:D10.
- FALSE: Specifies that VLOOKUP should perform an exact match. If the email isn’t found in column B, the formula will return #N/A.
Using VLOOKUP with the full range and the correct column index ensures accurate retrieval of data, like the department based on an email address.
Advanced Applications of VLOOKUP Functions in Google Sheets
VLOOKUP can go beyond basic lookups to handle more complex tasks. These advanced applications enable more dynamic and flexible data management for robust spreadsheet solutions.
Comparing 2 Columns with VLOOKUP in Google Sheets
VLOOKUP can be used to compare two columns and identify common or missing values, making it a valuable tool for data analysis. By using one column as the search key and another as the lookup range, you can easily determine matches or discrepancies between datasets, streamlining comparisons for large datasets.
Suppose you have two columns of email addresses, and you want to find emails in the Left List that also appear in the Right List. Using the VLOOKUP formula, you can compare the two columns and identify matching values.
You can use this formula:
=VLOOKUP(C3,D$3:D$10,1,FALSE)

Here:
- C3: Refers to the cell in the Left List (main dataset) containing the email to compare.
- D$3:D$10: Defines the lookup range in the Right List. The dollar signs ($) lock the range, ensuring it remains consistent when the formula is dragged down.
- 1: Indicates the return value is in the first column of the lookup range.
- FALSE: Ensures an exact match; if the email doesn’t exist in the lookup range, the formula returns #N/A.
This formula effectively identifies matching emails between the two lists. Matching emails are displayed, while non-matches are shown as #N/A. Use this approach for quick comparisons in Google Sheets.
VLOOKUP with Multiple Criteria in Google Sheets
The VLOOKUP function doesn’t natively support multiple criteria, but you can work around this limitation by creating a helper column that combines the criteria into a single value. This approach acts as a conditional VLOOKUP that allows you to search for matches based on multiple fields, such as first name and last name, for more precise lookups.
Let’s use the dataset where First Name and Last Name are split into two columns, and we create a helper column to join them for finding the department of "James Smith."
Let's first create a helper column for combining the names:
=C3&D3

In this scenario, we have added First Name in cell H2 and Last Name in cell H3. Now, to find the department for "James Smith" by combining the first and last names directly in the formula.
Use the following formula in H4:
=VLOOKUP(H2&H3,B3:E10, 4, FALSE)

Here:
- H2 & H3: Combines the values in H2 ("James") and H3 ("Smith") into "James Smith."
- B3E10: The range includes the "Full Name" column (B) and "Department" column (E).
- 4: Specifies that the return value (Department) is in the 4th column of the range.
- FALSE: Ensures an exact match for the combined search key.
💡Learn how to handle complex data lookups using multiple criteria with this comprehensive guide. Simplify your tasks and unlock advanced functionality in Google Sheets. Read more here: VLOOKUP with Multiple Criteria in Google Sheets.


VLOOKUP Function on Another Sheet within the Same Spreadsheet File
VLOOKUP can be used to retrieve data from a different sheet within the same spreadsheet file. By referencing the sheet name and the range, you can seamlessly perform a VLOOKUP from another sheet for better data organization and analysis.
In this scenario, we have two sheets: Employees and Payments. The goal is to retrieve the Hourly Pay for specific Employee IDs from the Employees tab sheet and display it in the sheet named – VLOOKUP on Another Sheet within the Same File sheet.

Here’s how to fetch the Hourly Rates for Employee IDs E010, E013, and E16 from the “Employees” sheet and display them in cells C4, C5, and C6 on the other sheet.
Use the following formula in C4:
=VLOOKUP(B4, Employees!$B$4:$D$11,3)
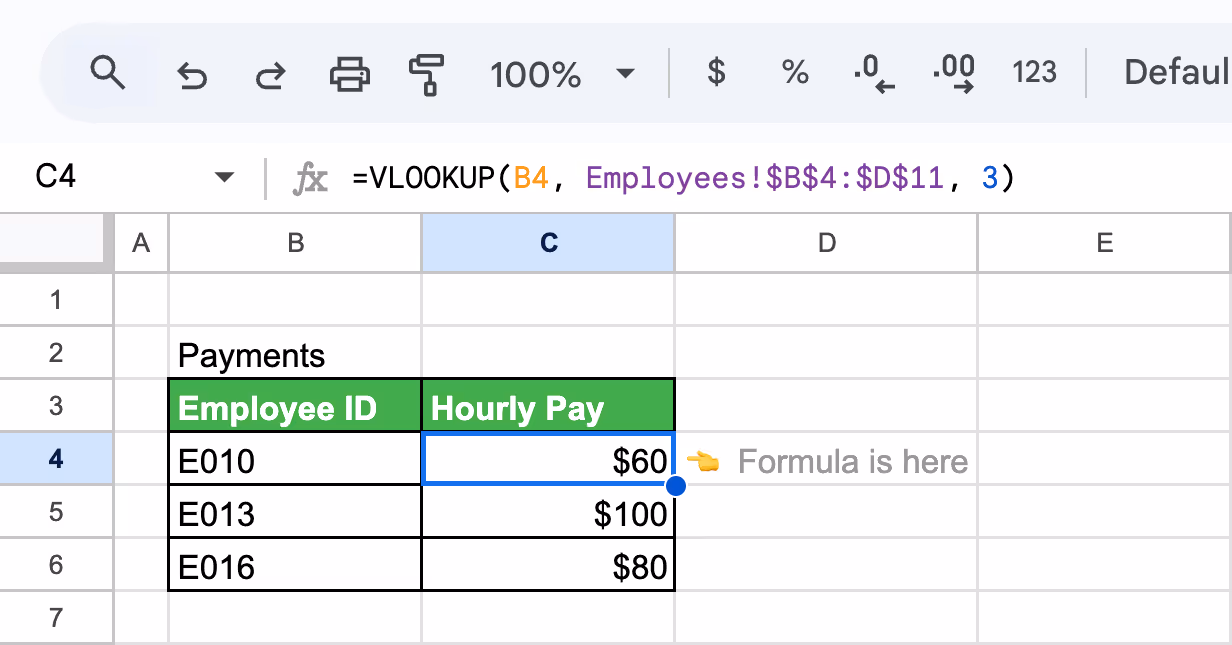
Here:
- B4: Refers to the Employee ID in the second sheet that you want to look up.
- Employees!$B$4:$D$11: Refers to the range in the Employees sheet where the data is stored. The $ locks the range, so it doesn’t change when dragging the formula.
- 3: Specifies that the Hourly Pay is in the 3rd column of the Employees sheet range.
- FALSE: Ensures an exact match for the Employee ID.
By using the VLOOKUP function with a reference to another sheet, you can efficiently fetch and display relevant data like hourly pay for employees.
Combining the VLOOKUP Function with Other Google Sheet Functions
VLOOKUP becomes even more powerful when combined with other functions. These combinations allow you to handle complex scenarios, automate data processing, and create dynamic, flexible formulas for advanced data analysis and management.
VLOOKUP from Another Workbook Using IMPORTRANGE
VLOOKUP can retrieve data from a different spreadsheet file by combining it with the IMPORTRANGE function. This allows you to access and search for values across files, making it ideal for managing and analyzing data stored in multiple spreadsheets.
Suppose you want to retrieve the Hourly Pay for a specific Employee ID (E010) from an external spreadsheet file containing the "Employees" data, and display it in the current sheet tab named – VLOOKUP Using IMPORTRANGE.
So, the employee dataset is in another spreadsheet, which is the source spreadsheet:
The URL is: https://docs.google.com/spreadsheets/d/1vTAjL1QL_LwB03N6w51ZVOsjoepHFLdTpKDEB9LXPA4/edit?gid=0#gid=0

Use the following formula in a current spreadsheet in cell C3:
=VLOOKUP(B2,IMPORTRANGE("https://docs.google.com/spreadsheets/d/1vTAjL1QL_LwB03N6w51ZVOsjoepHFLdTpKDEB9LXPA4/edit?gid=0#gid=0","Employees!$B$4:$D$11"),3)

Formula explanation:
- B2: Refers to the Employee ID (E010) in the target sheet.
- IMPORTRANGE: Retrieves data from the source spreadsheet ("Employees").
- URL: The URL of the source spreadsheet.
- "Employees!$A$4:$C$11": The range in the source spreadsheet containing the "Employee ID," "Full Name," and "Hourly Pay."
- 3: Specifies the 3rd column of the range (Hourly Pay).
- FALSE: Ensures an exact match for the Employee ID.
Using VLOOKUP with IMPORTRANGE allows you to retrieve data from another workbook file seamlessly. Ensure proper access permissions are granted, and always lock your ranges to maintain accuracy when dragging formulas.
💡 Essential for bringing in data from multiple external sources, the IMPORTRANGE function significantly improves the capabilities of data analysis. Check out our complete guide on using IMPORTRANGE, and get a free template to make the most of this powerful tool.

Using the VLOOKUP Function with ARRAYFORMULA to Retrieve Multiple Columns
VLOOKUP combined with ARRAYFORMULA allows you to retrieve data for multiple rows and columns simultaneously, saving time and effort. Instead of applying the VLOOKUP formula row by row, this method dynamically processes entire ranges, making it an efficient solution for large datasets or complex lookups.
In this example, we’ll use VLOOKUP with ARRAYFORMULA to dynamically retrieve multiple columns of information (Full Name, Email, and Department) based on Employee IDs.
Use the following formula:
=ARRAYFORMULA(VLOOKUP(G4:G6, B3:E10,{2,3,4}, FALSE))

Here:
- ARRAYFORMULA: Applies the VLOOKUP formula across multiple rows without needing to manually copy the formula.
- G4:G6: The Employee IDs to search for.
- B3:E10: The range containing the Employee ID, Full Name, Email, and Department.
- {2,3,4}: Retrieves values from the 2nd, 3rd, and 4th columns of the range (Full Name, Email, and Department).
- FALSE: Ensures an exact match
Using ARRAYFORMULA with VLOOKUP, you can retrieve multiple columns of data dynamically for several rows at once.
VLOOKUP WITH MATCH for Dynamic Column Selection
Using VLOOKUP with MATCH lets you dynamically retrieve data from a specified column by referencing its header. This eliminates the need to hard-code column indices, making your formulas more adaptable to changes in data structure or column order.
In this example, we use VLOOKUP with MATCH to dynamically select the column to retrieve data based on a header value. We will extract the department of an employee, using their Employee ID as a search key.
Use the following formula:
=VLOOKUP(F3, B3:D10, MATCH(G2, B2:D2, 0), FALSE)
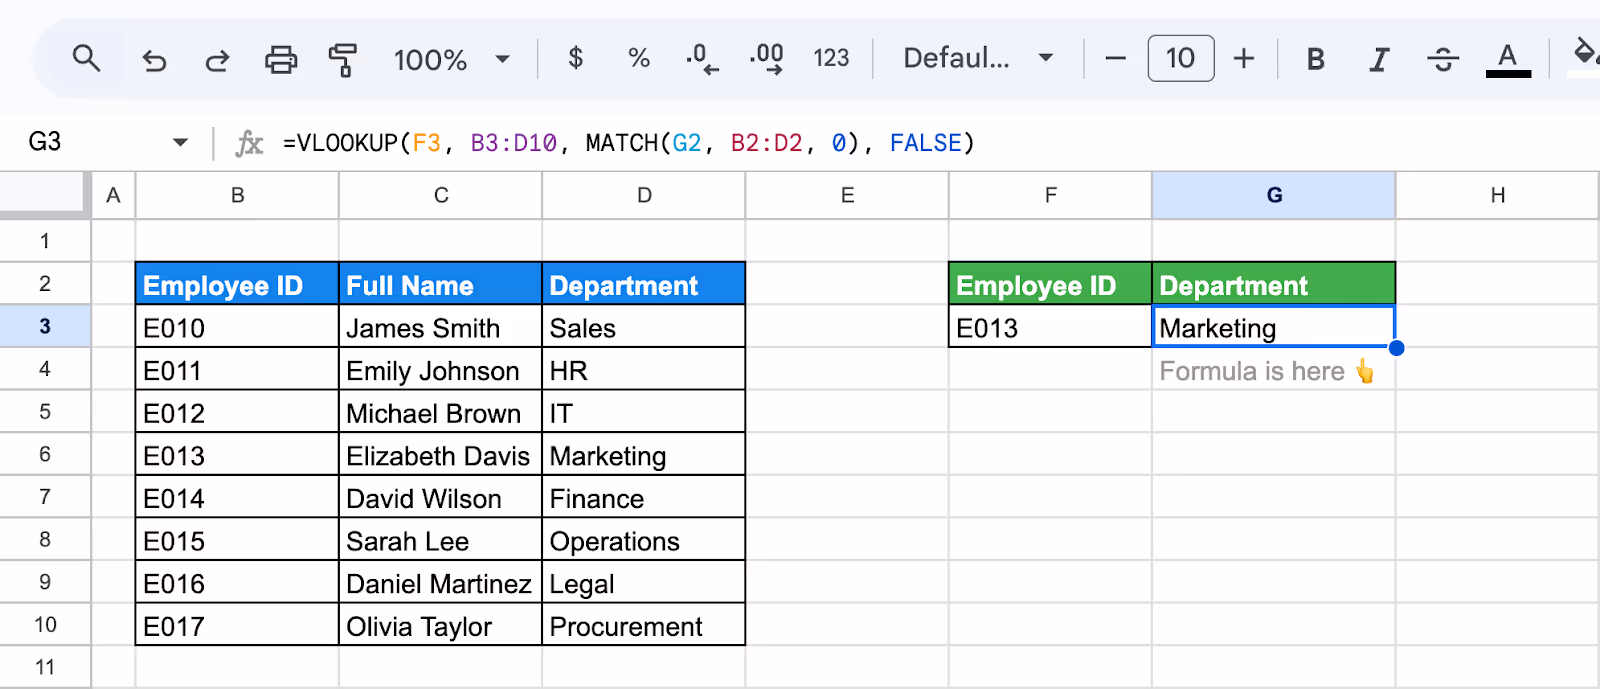
Here:
- F3: Refers to the search key (Employee ID) you want to look up.
- B3:D10: The range containing the Full Name, Employee ID, and Department columns.
- MATCH(G2, B2:D2,0): Dynamically determines the column index based on the value in G2, searches for the header name (e.g., Department) in the range B2:D2. Also returns the relative column index
- FALSE: Ensures an exact match for the Employee ID.
By combining VLOOKUP with MATCH, you can dynamically retrieve data based on column headers, such as the department of an employee using their ID.
Using VLOOKUP Function with IF and ISNA to Handle Missing Data
Combining VLOOKUP with IF and ISNA allows you to perform lookups while managing missing or invalid data. If the lookup value isn’t found, ISNA detects the error, and IF provides a custom output, like a message or default value, instead of showing an error.
Suppose you want to retrieve the salary of an employee based on their Employee ID. If the Employee ID is not found in the dataset, you want to display a custom message like "Employee Not Found" instead of an error.
Use the following formula for the selected employee ID:
=IF(ISNA(VLOOKUP(F3, B3:D10, 3, FALSE)), "Employee Not Found", VLOOKUP(F3, B3:D10, 3, FALSE))

Here:
- F3: Refers to the Employee ID in the current sheet that you want to look up.
- B3:D10: Defines the range where the lookup is performed, including the Employee ID, Full Name, and Salary. This range is static, ensuring consistent referencing.
- 3: Specifies that the Salary is in the 3rd column of the defined range (B3:D10).
- FALSE: Ensures an exact match for the Employee ID. If an exact match is not found, the formula returns an error.
- ISNA(VLOOKUP(...)): Checks if the VLOOKUP function returns an #N/A error, indicating that the Employee ID is not found in the dataset.
- "Employee Not Found": Custom message returned if the Employee ID is not found.
This formula efficiently combines VLOOKUP, IF, and ISNA to handle missing values and provide meaningful outputs, ensuring smooth and error-free data lookups.
💡 Learn how to combine VLOOKUP with IF statements in Google Sheets to handle missing data and create dynamic, error-free lookups. Explore the full guide here: How to Use VLOOKUP with IF Statement in Google Sheets.
Troubleshooting Common Errors of VLOOKUP and How To Solve Them
VLOOKUP is a powerful tool, but errors can arise if the function is not set up correctly. Understanding the most common issues and their solutions ensures accurate and efficient lookups. Let’s explore the typical errors encountered with VLOOKUP and how to resolve them step by step.
#N/A Error
⚠️ Cause: The #N/A error occurs when the lookup value is not found in the first column of the table array, which is required because Google Sheets VLOOKUP can’t look to the left. This error can also occur due to data type mismatches, such as numbers stored as text or vice versa.
✅ Solution: Ensure the lookup value exists in the first column of the table array. Use the more flexible INDEX MATCH combination, which lets you return values from any direction, left or right, by referencing ranges directly. Verify there are no data type mismatches, such as numbers stored as text or vice versa.
#REF! Error
⚠️ Cause: The #REF! error typically arises when the column index number (col_index_num) in the VLOOKUP function is invalid. This happens if it’s less than 1 or exceeds the number of columns in the table array.
✅ Solution: Verify the col_index_num argument. Ensure it falls within the range of columns in the table array and accurately references the column you want to retrieve data from.
#NAME? Error
⚠️ Cause: The #NAME? error signifies that Google Sheets doesn’t recognize part of the formula. This could result from misspelling the function, an undefined named range, or an incorrectly spelled named range.
✅ Solution: Double-check the spelling of the VLOOKUP function and any named ranges. Ensure the named range exists and is properly defined in your spreadsheet.
#VALUE! Error
⚠️ Cause: The #VALUE! error occurs when the range argument in the VLOOKUP function is invalid. This might happen if the range includes non-numeric characters or if the range isn’t properly defined.
✅ Solution: Review the range argument to confirm it’s a valid reference and doesn’t include non-numeric characters. Check the accuracy of cell references if the range is manually defined.
Best Practices to Follow When Using VLOOKUP in Google Sheets
VLOOKUP is a powerful tool for data lookup and organization, but using it effectively requires careful attention to its rules and limitations. Following best practices ensures your formulas are accurate, efficient, and error-free.
Ensure Your Search Key is in the First Column of the Range
VLOOKUP requires the search key to be in the first column of the specified range. If it isn’t, you’ll need to rearrange your data or modify the range. This is a key limitation of VLOOKUP, as it cannot look to the left of the search key for matching values. Plan your data layout accordingly.
VLOOKUP Only Finds the First Match
VLOOKUP always returns the first instance of a matching search key. If there are duplicates, it won’t retrieve values for subsequent matches. Consider using alternative functions like FILTER or QUERY to handle duplicate values, which provide more advanced options for working with multiple results. This ensures a more comprehensive analysis.
Use Absolute Cell References for the Range
To copy the VLOOKUP formula across cells, use absolute references (e.g., $A$1:$B$10) for your range. This helps lock the VLOOKUP formula and ensures the range remains fixed when you drag the formula to other rows or columns, preventing errors caused by shifting references. Consistent referencing makes your formulas more reliable and easier to manage.
Double-Check Your Range and Column Index
Errors often occur due to incorrect ranges or column index numbers. Ensure your range includes the search key column and the desired return column. Verify the column index corresponds to the position of the return column within the range for accurate results. Cross-checking these details saves time in debugging.
Practice with Different Datasets
Practicing VLOOKUP with various datasets is essential to mastering it. Experiment with exact matches, partial matches, and data spread across sheets. The more you practice, the better you’ll understand its functionality and how to troubleshoot common issues effectively. Familiarity with varied scenarios builds confidence.
Boost Your Data Analysis With Google Sheets Formulas
Google Sheets is equipped with a variety of powerful formulas that streamline your data analysis efforts-
- Pivot Table: Facilitates efficient data summary and analysis, helping you quickly spot patterns and trends through automated organization.
- SUM Function: Adds up a range of numbers or values, making it essential for calculating totals quickly.
- CONCATENATE: Links together several text segments into a single string, simplifying the combination of text from various cells.
- UNIQUE: Filters out duplicate entries from a specified data range, leaving only unique values.
- HLOOKUP: Searches for a value in the first row of a range and returns a value from the same column in a specified row.
- LOOKUP: Finds a value in a range, either vertically or horizontally, and returns the corresponding value from another range.
Transform Your Data with OWOX: Reports, Charts & Pivots Extension
Simplify your data analysis in Google Sheets with the OWOX: Reports, Charts & Pivots Extension. Effortlessly create detailed reports, dynamic charts, and comprehensive pivot tables to manage large datasets and achieve precise visualizations. OWOX streamlines your analytics, making complex tasks simple and efficient.
Designed for advanced data analysis, this tool empowers you to interpret and utilize your data effectively. Gain clear insights and make informed decisions with features tailored to provide clarity and actionable results.
FAQ

%202.png)


